  ® ®
|
Stiction-Tuning Late 70s to Early 80s
Japanese Forks
In Three Simple Steps
|
|
Here's a description of just part of the service I used to offer back in the 1980s when I did suspension tunes for southern California HSTA members. I did a heck of a lot of these for the V4 folks, with not one disappointed customer, and really enjoyed doing them in my little shop in Long Beach, CA. Incidentally, this article has been slightly revised from the version I wrote back in the late 1980s but never published, and that the VMax group without authorization appropriated. :-)
|
|
STEP ONE: BLUEPRINTING
Disassemble the fork completely. Lay the parts out on an old towel, wash with brake cleaner and wipe clean. If the factory foam piece was still on place on top of each fork seal, throw the foam away. Honda themselves recommends this in a pair of bulletins sent to dealers, because the foam, intended to keep the tube oiled and so help reduce stiction, instead gets caught in the seal, making the fork leak. It didn't work in other words.
Cut some V-blocks from short pieces of 2x4 to lay the tubes on, and spin them to see if they're bent. If so, get them straightened. If they've *been* straightened, or the bike has been crashed, look for creases, common results from straightening, which if found relegate those parts to the dumpster. Also check them for scratches or nicks, neither of which is fixable: the seals will always, always leak. It is not widely understood, but stock Japanese bike fork tubes are extremely soft-- merely a slip of your wrench while removing the front fender can ruin them. They are also chrome plated, so attempts at repairing surface issues are not effective. The aftermarket tubes used to be even poorer quality, but in recent years they have at least come up to OEM standards, which isn't saying much. But at least I can recommend Frank's Forks now, whereas thirty years ago I couldn't. Examine the so-called Teflon bushings for wear. If even a little of the black coating is worn off, replace them. These low-friction black-coated over brass steel bushings are what make your mass-produced Japanese fork work as well as it does. Before they emerged at the end of the 1970s, fork tubes ran directly on the interior of the slider, and were prone to jerky operation. However, the bushings seem to wear pretty quick, and the coating gets into the hydraulic fluid.
|
|
Onto one tube, install new Teflon bushings and the slider, using a fork seal driver to get the upper bushing all the way in. Use the correct driver, not a hammer and punch! And don't install the seal or dust scrubber, just the bushings.
|
|
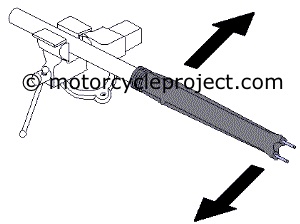
Clamp the tube in a vise (protect it from the jaws) and rock the slider side to side to feel (and even hear!) the clearance. We're going to take most of that out, using the Pierre DesRoches/ Joe Minton bushing procedure outlined in the January 1985 issue of Motorcyclist magazine ("Deslopping Your Sliders").
|
|
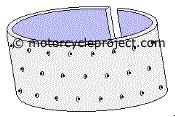
Disassemble the fork leg, remove the bushings, and slip the *upper* one onto a closely-sized piece of pipe (an old fork tube is best, don't use your actual tube) and lightly dimple the outside of the bushing with a center punch. This increases the bushing's thickness, snugging its fit between the tube and slider.
After dimpling, gently clamp the bushing in the vise and hacksaw 1/32" out of its gap. File the raw edges smooth and lay the bushing aside.
|

|
Clamp the tube back in the vise and wrap a 0.001" feeler gauge around the groove that the lower bushing fits into, then slip the bushing back on. This tightens up the lower bushing. Install the slider and upper bushing again (use the seal driver) onto the tube and clamp the assembly in the vise once more to check for slop. If the slop is gone but the fit is too tight, remove the slider, and the bushings, and file the dimples slightly and/or cut back the shim with scissors (do one and retry for slop, but not both unless it's necessary), and rebuild and retest. If on the other hand it's still loose, repeat the process above. Continue tightening the clearances (and if you go too far, loosening them,) until the slop is gone, yet the action is still smooth. This can take a lot of time, but it's worth it. In fact, I'll warn you that perfection is elusive. What happens when you remove that last little smidgeon of excess clearance, until the fork has absolutely no side play, is it feels good in one spot but binds in another. The fork will be harsh. This happens because mass-produced fork parts are not perfectly round, straight and perpendicular. A thousandth of an inch irregularity, compounded by three dimensions and repeated in countless places, produces a product that ultimately needs ten thousandths worth of slop just to work freely. Our goal is to remove the few thou it doesn't need, down to that last thousandth. Take your time; it's an exceedingly fine line we're treading; we're basically hand fitting the parts. Go slow. Be thoughtful and methodical, and don't move on to the next step until you're satisfied with your optimum balance of smoothness and slop reduction.
|
|
STEP TWO: STICTION TUNING
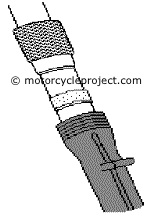
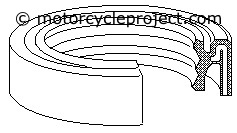
If you've ever pushed a heavy box full of stuff (motorcycle parts?) across a garage floor, you've noticed it's harder to get it moving than to keep it moving. You've learned a lesson in stiction. The word "stiction" is a contracted form of the words static and friction. That's what your fork has: a tendency to bind. It's the nature of the beast. But the stiction in your bike's fork can be reduced, and so easily, and with such remarkable results, it will surprise you. Start by sanding the i.d. of the dust scrubbers with 80-grit emery paper. Keep sanding and trying their fit (each time washing very carefully) until they literally fall down the tube. Next, take your fork seals to a bearing house -- better yet, a motorcycle dealership where the partsman is sharp and the inventory sufficient and varied -- and ask for 2-lip replacements.
Factory seals are triple-lip, designed to seal air-assisted forks. The two-lip seals will probably be a little thinner than the original, but that's okay. If your forks are air-assisted, as so many of the 70s were, you should put better springs in and preload the springs so you can do without the factory recommended added air pressure.
|
|
STEP THREE: ALIGNMENT TUNING
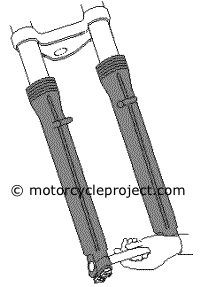
Assemble the fork, leaving out the oil and springs, wheel and fender. Lightly snug the triple clamps. Bolt in the axle, tightening it in its clamps without the wheel. Pay close attention to the axle clamps (on Hondas, those arrows go forward - tighten the front nuts first), using normal torque. Now raise this axle /slider assembly all the way to the top of its travel and let it go.
Does it drop to the bottom of its travel unaided? If it doesn't budge, you've got some serious binding somewhere. If it's just a little slow to drop, remove the axle, loosen one of the damper rod's allen bolts (either one), turn the slider 90 degrees, retighten the bolt, replace the axle and try the drop test again. Repeat as necessary, tuning one or both damper rods, until you achieve maximum "drop speed." Take your time. Next, tap the top of one of the fork tubes with a soft mallet to move the tube downward in its clamps a smidge (0.010"-0.020") and try the drop test again. If there's no change, tap some more. If still no change, raise the slider/axle assembly all the way to the top of its travel and tap on the bottom of the leg upward, which will move the tube upward in its clamp, and check with the drop test again. Try tapping the other leg also.
Do you see what we're doing? We're hunting for the best alignment. Because of manufacturing tolerances, the best internal alignment may very well occur when one of the fork tubes is incrementally higher than the other. Say 0.050"-0.080". That's okay. It's far more important to align the fork's parts internally, than it is to worry about what they look like on the outside. Just remember to fully tighten the triple clamp bolts when finished. At this point, try the front fender. Install it and do the drop test. Don't let the fender influence fork movement. Reshape its inner bracket, shim between the fender and the sliders--whatever it takes to get the same drop speed with and without the fender.
|
|
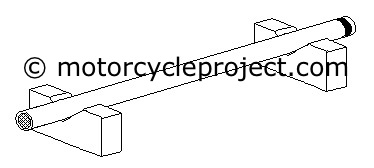
Stiction tuning makes a noticable difference. Be sure to do all of the steps in order. There's one more goal in stiction tuning. If you want some heartache, or rather a reality check, at this point install your fork brace, if you have one, and check the drop test with it added to the mix. Very disappointing, isn't it? I Have never found a fork brace, even the factory's, that did not muck up all my hard work, and the aftermarket ones are far worse than the factory's. For this one reason, I am not a fan of aftermarket fork braces. If you race your bike, I understand how you feel about that part, but I still do not recommend them, except for possibly the old horseshoe-shaped bolt-to-the-fender-boss ones I think came out of CC Products. They're made right and can be tuned, neither of which is true of the clamp-on type. For what it's worth. :-)
|
|
|