  ® ®
|
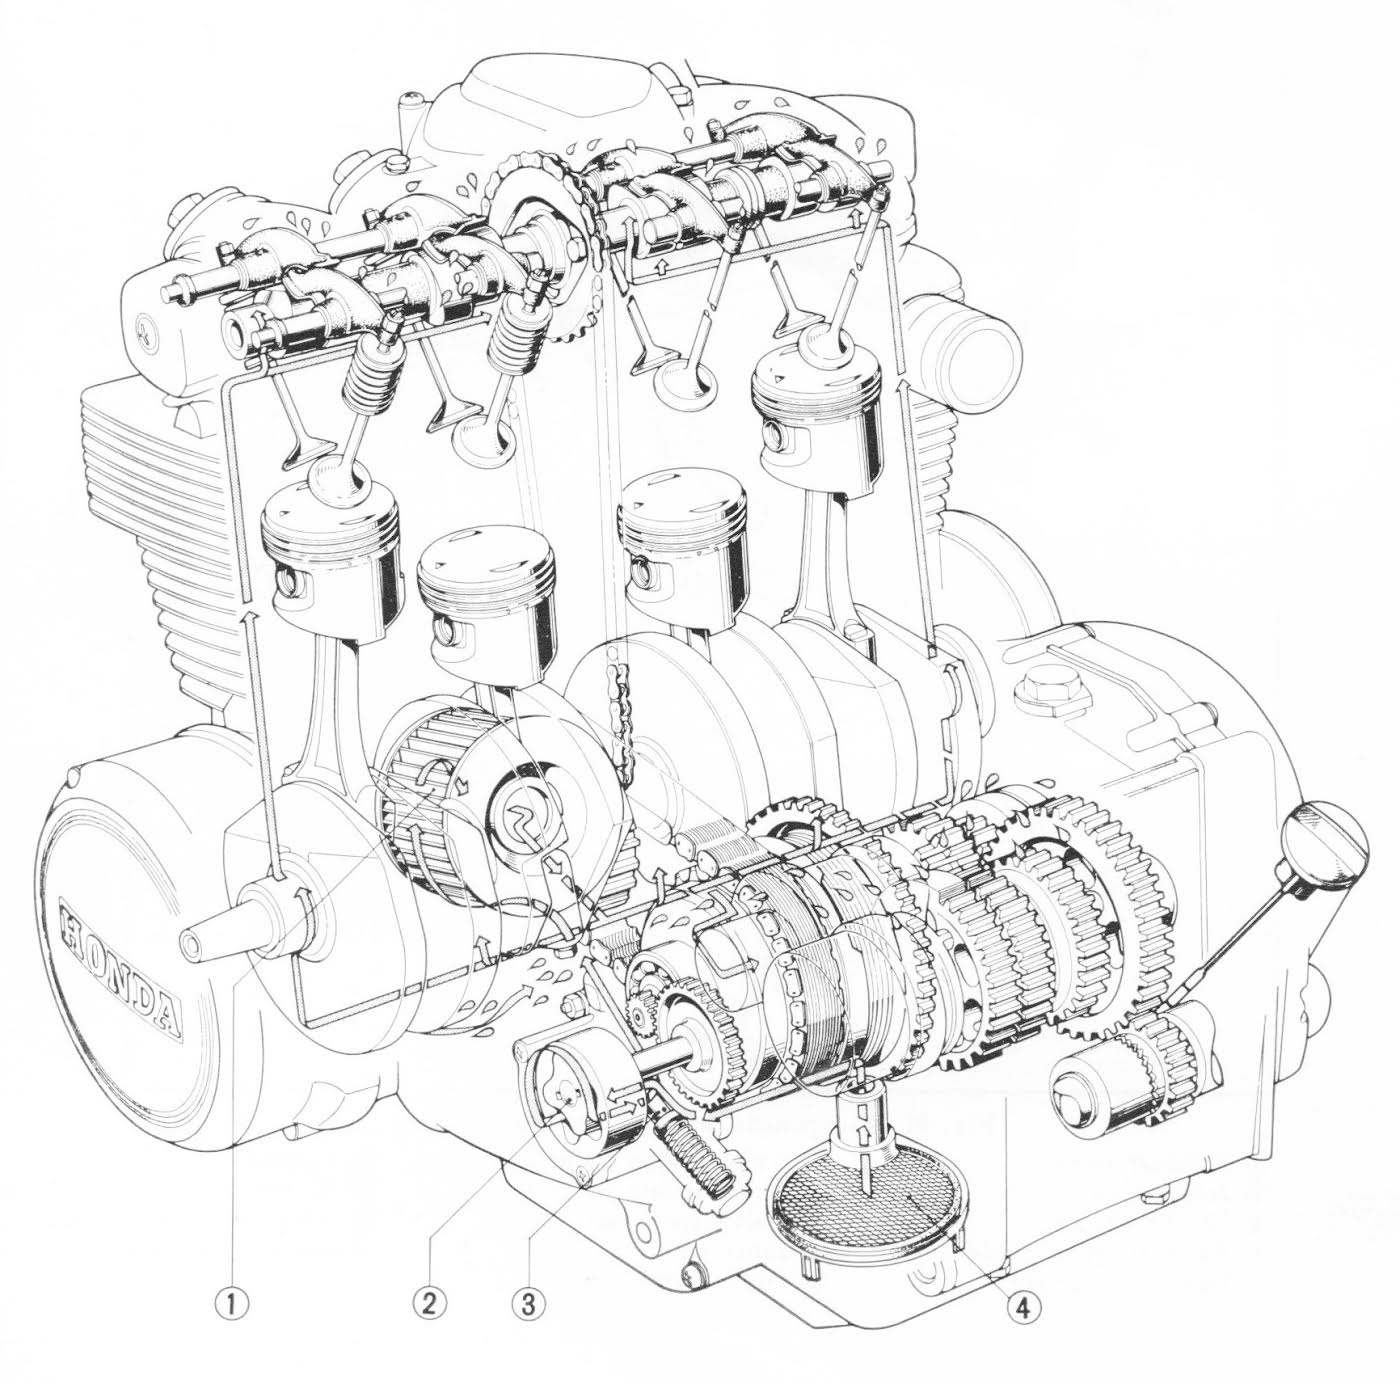
CB350F, CB500/550 Four, and CB650 engine rebuild tips |
|
It's well-known that unlike many Honda engines, the 1970s small four engines don't require special tools in order to disassemble and reassemble. The use of one or two special tools will make the task easier, however.
Before disassembly is a critical stage of the rebuild. Really important measurements must be made while the engine is still intact. The obvious one is cylinder compression. Use a good tool for this, the results are pivotal. If not the industry-standard Snap-On, then at least an equal quality unit. One way to identify a good tool is that it is built around individual hoses instead of one hose and a handful of adapters. The engine does not need to be warmed up first. After the compression tests, you then want to do cylinder leakdown tests to determine where compression losses are focused, whether at cylinders or valves. The compression test is a good quick test to detect sealing loss, the leakdown test is needed to tell you where. These tests are important in any engine, any age or mileage, and the compression test should be considered part of regular maintenance. The SOHC fours especially require them due to their soft valves issue. While the bike is still intact is also a good time to qualify the charging system, measure oil pressure, and take note of exhaust smoke and oil leaks, if any. Also, note if the starting system is making noises, either like spinning uselessly or skipping and grinding. The starter drive ("clutch") is not as typically worn as on Honda's twins, but it does eventually wear, and it's more work to correct since it is part of the primary drive and thus not as easy to access. One more thing to note with the engine running is how much the primary chain rattles. Of the small fours, only the CB650 has a tensioner, so a quiet primary chain depends a lot on how well the engine is tuned, especially carburetor throttle sync. But you need to start with a decent chain to begin with, and on the CB500/550 especially the primary chain is significantly worn by just 10,000 miles.
After doing these tests, decide whether you're going to do just a top end or the whole engine. While doing just a top end means you can leave the engine in the frame, removing the engine to do the whole thing is not that much more work. Assuming a complete engine rebuild, remove fuel tank and sidecovers (if you haven't already), and the carburetors and exhaust. Remove the shift lever. Drain the engine oil and remove the oil pan, oil pickup, and oil filter. Also disconnect the spark plug wires, alternator with its cables, starter motor cable, clutch and tach cables, and the engine drive sprocket. Unbolt the engine's breather cover and remove all of the engine mounting bolts. Remove or bunjee-cord the rear brake pedal out of the way. By straddling the bike and gripping the kickstart lever and the alternator rotor, the engine can now be removed from the right side of the frame. It's not very heavy. To lighten it somewhat, disassemble the top end in the frame before pulling the engine.
You don't really need an engine stand. The small fours are light and easily worked on as-is on the workbench. However, a simple plywood cradle having four holes and a flat bottom makes a very useful homemade engine base. Remove the spark plugs and the eight valve inspection covers. Remove the decorative cam end covers on the CB500/550 and the brackets underneath them, taking special note of the two dissimilar washers on each bracket. Remove the several 6mm bolts and screws holding the cam cover on, starting with the outer ones and working inward. Take note which of these have sealing washers on them. We'll determine which should have washers later. Remove the cam cover. Unbolt the camshaft sprocket by accessing its two bolts. The cam and sprocket go out together toward the left. Remove the six rubber wafers. On the CB350F remove the two oiling pipes. Remove the 6mm (10mm hex) bolts at the front and rear of the cylinder head. Remove the 8mm (12mm hex) head nuts, beginning at the outer edges and working your way inward. Be sure to retrieve each nut's washer, some of them will require a magnet to remove.
The cylinder head can now be removed. Rarely is it stuck, so if it seems so, check all of the nuts and bolts, especially those at front and rear. The best way to pry the head loose is with a length of 2x4 levered between the crankcase and #1 intake manifold. After the head is off remove the cam chain guide. On the CB350F the guide can be removed before removing the head, on the 500/550 you do it after. Remove the cylinder assembly. If as usual the cylinder is stuck there is a good place to pry, and the factory put it there on purpose. Find the boss at the front of the head that has the engine displacement number cast into it. Right next to it is a thick boss meant for prying. Don't pry anywhere else. If really stuck that 2x4 can be put to use again, this time with a hammer, to carefully impact the cylinder assembly upward off the base gasket. Once the cylinder comes loose you can lift it off using a hand on each end.
Special notes: If you are doing just a top end, and are maybe just doing a head gasket, it is tempting to leave the cylinder assembly as-is after removing the head. Don't. Relieving pressure from the top end parts by removing the head will break the base gasket's seal. This gasket will need to be replaced as the chances of it leaking if not replaced are high. If the head is removed, the cylinder assembly has to be removed also. Another tip: If your rebuild is focused on the transmission, of course the engine has to be removed from the frame, but the top end does not have to be disassmbled unless the crankshaft or connecting rods are being serviced. And still another tip: The cam chain should be replaced if it has more than 10,000 miles on it. It can be replaced by removing the crankshaft and it can also be replaced without removing the crankshaft by cutting both the the old chain and the new one, and using the factory master link from a 1970s CB450.
Time to inspect the connecting rods. One at a time, rotate the crankshaft to get a rod in its downward-most (bottom dead center) position and do two checks. First, rock the rod side-to-side. This gauges rod bearing wear. There needs to be no more than a millimeter (0.040") of swing at the top of the rod. Second, attempt to move the rod up and down vertically. You must not detect movement. A more definitive test is done after splitting the cases if you're removing the engine. Now rotate the crankshaft again and get each rod in turn at top dead center. Carefully visually inspect the straightness of the rod looking at its profile. You'll be able to see a bent rod. Check each rod for straightness both from the side and from the front.
Remove the ignition plate and advancer from the engine's right side. Reinstall the advancer without the ignition. Remove the clutch cover and the clutch, taking note of the large washer behind. On the CB500 retrieve the very thin shim behind the snap ring. Remove the shift shaft. Remove the oil pump and retrieve its o-rings. Feel the primary chain. Some looseness in this chain is normal. Excessive looseness will be evident as a rattle at engine idle. On the 500/550, remove the primary shaft's bearing retainer plate and tap the shaft out of the cases from the oil pump side using a brass punch. The factory way is to thread a slide hammer into the side opposite the pump. On the CB350F/400F remove the snap ring holding the ball bearing on the left side and remove the bearing, and remove the primary shaft. Flip the engine right-side-up temporarily and remove the several crankcase bolts on the crankcases topside. Be sure you get them all, including any under the starter motor.
Flip the engine upside-down again and remove all the bottom crankcase bolts, starting with the smaller 6mm ones. On the 500/550 one of these bolts is inside the oil pan area. Don't overlook it. Leave the alternator rotor on the crankshaft. It helps with separating the engine cases.
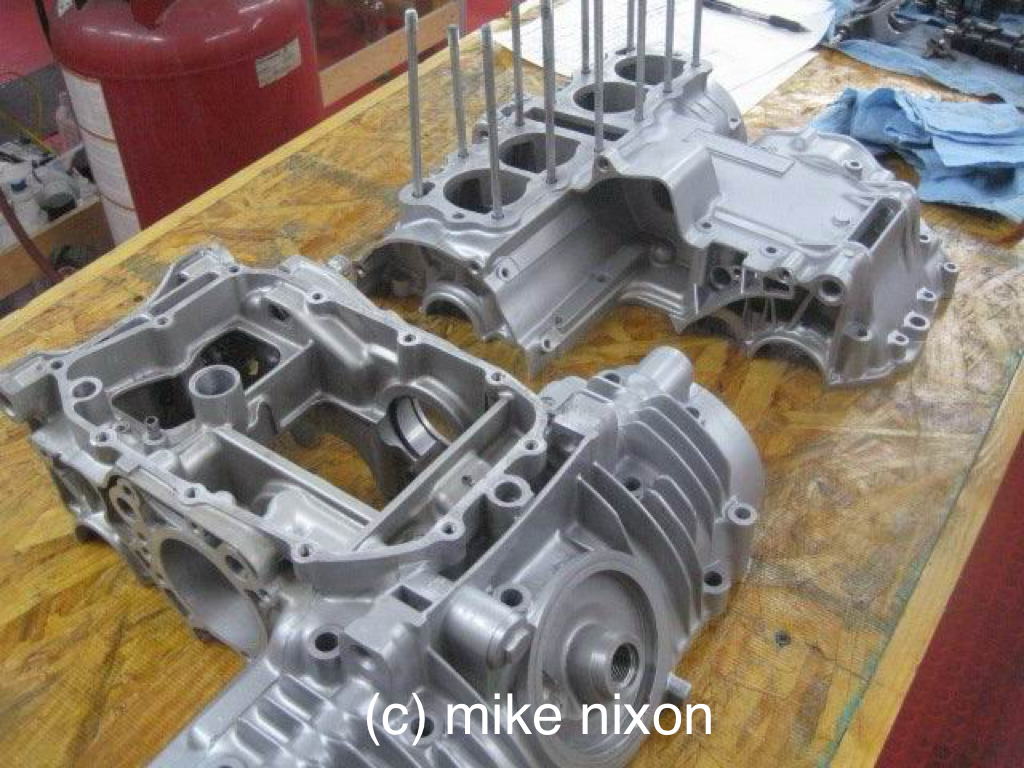
You need to be meticulous. Double- and triple-check that all of the crankcase bolts have been removed, top and bottom. That is, flip the engine right-side-up momentarily to double-check, then flip the engine again to the upside-down position. Caution: Wailing away with even a soft hammer on the cases is bad practice and is usually associated with not having got all the bolts out. Once you're sure, there are two places to pry to get the cases to separate. Put a piece of wood on top of the alternator rotor (you left it on for this reason) and insert a large prybar on top of that. Pry upward on the crankcase, carefully but firmly. Once separation happens here, move your prybar to the transmission output shaft. No wood is needed here. Lodge your prybar against the output (counter) shaft and lever upward against the engine mounting boss on the crankcase. Don't hammer. Hammering is "cave-man". Lift the case bottom off and set it aside.
Extract the primary cush drive from the primary chain. Leave the primary chain on the crankshaft unless you're replacing it. The cush drive can be disassembled and the rubber dampers replaced, a good idea. The starter clutch half of the assembly can be inspected also. Look for loose screws and once the rotor is removed, signs of the rollers skipping. The sheet metal cover will show pimples if the assembly has been disintegrating. If the starter clutch was acting up per your pre-disassembly testing, then you know you'll need to rebuild it.
Now the real work: parts inspection and finding quality replacement parts. As with sny 50-plus-year old Honda engine, there will be parts availability challenges. Fortunately, though NOS (new old stock) parts are virtually gone, the CB500 and CB550 were widely sold and thus their parts are well represented on the used parts market. They're plentiful. The CB350F is another matter. Used parts for it are rare. The good news is, because these bikes were never considered touring bikes, these parts tend to be lower mileage than might be expected. But avoid Chinese parts, that is, virtually all aftermarket parts, wherever they're made, including aftermarket gaskets. Crusin Image piston sets are junk. Their rings wear astonishingly quickly and the piston pins are smaller diameter than stock. Yeah, they wiggle. Try very hard to get OEM gaskets and seals, though they are hard to find and aftermarket sources like 4into1 are abundant. The head gasket is discontinued from Honda but can be sourced from Cometic, the well-known US (Ohio) supplier of quality OEM knockoff composite gaskets. Don't use anything else.
After removing the crankshaft, inspect the rods' small end for bluing or galling, and insert a piston pin and note the amount of wiggle. Worn rod small ends is rare on an SOHC four but it can happen if the engine is run low on oil. The rods "feel" it first thing.
The cylinders and pistons require special inspection. Have your machinist measure the pistons and then with a precision tool measure how differently-sized the cylinders are, that is, how much clearance there is. An experienced person does not use a feeler gauge for this. He will also record cylinder out-of-round and taper. The 500/550's factory clearance is very tight (0.0005"), and the CB350F the tightest of all (0.0003"). Too much clearance will result in oil consumption. The cylinder head needs its valve guides measured, and will in every case require new valves and the seats remachined. Stainless steel valves are available from Kibblewhite and these are what you should use. They will last four or five times as long as the stock valves or any other valve.
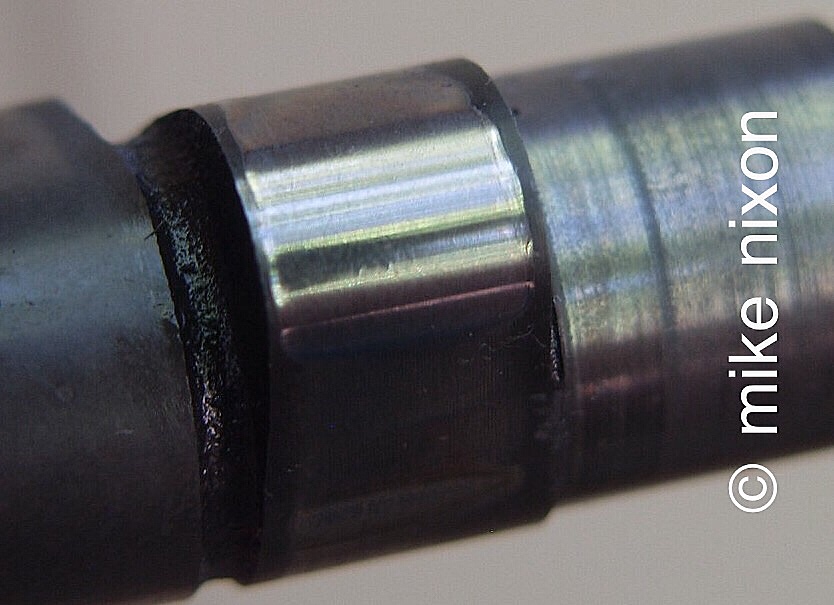
Inspecting the transmission and the crankshaft and rod bearings is best left to the professional. If you haven't had shifting issues, you may decide to leave the transmission undisturbed. Same with the crankshaft. But really, if apart this far, best practice is to do it all. If you remove the transmission shafts, realize their bearings have locating dowels and alignment rings. Beginners tend to reinstall without lining up those parts, which will damage the engine cases. When you remove the gears from their shafts for inspection, realize none of the gears is symmetrical; each goes on in only one way, sometimes with a special bearing underneath, sometimes with a washer, and sometimes neither, not to mention the presence of shims and snap rings in some places and not in others. It is a very technical assembly, with nothing intuitive about it. That said, the wearing parts of these gears in normal use is found on their sides not on their teeth. The sides are called "dogs", and is where engagement and disengagement happens. Honda gear dogs wear relatively quickly, partly because they're mass-produced. The transmissions engage their dogs to only about a two-thirds depth, this itself resulting in much of the wear. Some rounding of the dogs is acceptable, but not a lot. Once again, it takes experience to know how much rounding is tolerable. The shift drum and its selector forks require close inspection also, with the forks needing replacement if wear marks appear on their sides.
Remove the connecting rods from the crankshaft, taking care to preserve their orientation. Visually inspect the main and rod journals on the crankshaft, and the bearings. After cleaning, carefully Plastigage-measure each bearing. If you're going to replace the crankshaft and rod bearings, familiarize yourself with the factory bearing sizing system shown in the manual. It is nothing like typical automotive practice. The bearing range is tenths of one thousandth, not tens of thousands as in car engines. Plastigage is the correct measuring technique. If clearance is found excessive, read the color code off the edge of the offending bearing and from that determine the bearing's size from the size table in the official manual. If the color painted on the bearing is too faded, which is usually the case, then locate the manual's codes on the crankcase, crankshaft and rods, find these codes on the tables, and go from there. Plastigage any bearings that are replaced as a double-check. The crankshaft and rod bearings are hard to find now. Reattach the connecting rods with a tiny dab of Honda moly assembly grease on their journals and torque their bolts per the manual. Make sure the rods are on their original crankshaft journals.
Prior to crankcase reassembly, make sure the transmission shifts through all its gears. Do this by carefully rotating the shift drum and observing that each ratio is accomplished while vigorously spinning the countershaft. Do this completely two times, each time going up and down through the ratios and ending in neutral. Clean off all the factory case sealer from the crankcase halves. If someone was in there before and silicone is evident, be obssessive about getting that awful stuff out of there. Wipe all the upper and lower crankcase sealing surfaces with brake cleaner aerosol, at least twice, using a clean, lint-free rag. Put in new crankshaft and transmission seals. A new left side crankshaft seal will demand the alternator rotor be removed. A special rotor puller was available from Honda. Now it is found from aftermarket sources. With a fingertip, sparingly apply Hondabond #4 (or Threebond #1104) to the crankcase sealing surfaces. Avoid getting any on the bearings or the seals. Dab a touch of Honda moly grease on the crankshaft bearings. After positioning the primary cush drive into the primary chain, carefully lower the bottom case onto the top one, taking care to not jostle anything. Straight down. Reinstall the primary shaft you tapped out during disassembly. Tap it in from the the clutch side. Put in two of the longest and largest diameter crankcase bolts and snug them down gently. Now check for free movement of the crankshaft and the transmission shafts and go through the shifting ratios one more time. If any doubt, remove the case bottom and find the problem. It is very easy to get the transmission shafts and/or their seals out of place. Install and torque all of the lower crankcase bolts, beginning with the largest ones over the crankshaft, and starting in the center and working your way outward. Torque in three steps, first to one-third spec, then go over all of then again at two-third spec, then finally one more time at full spec. Don't over-torque. Check crankshaft and transmission shaft rotation again. Continue with the smaller crankcase bolts, using their specific torque specs and repeating the three tightening steps. Afterward flip the engine right-side-up and do the same with all of the upper crankcase bolts. Afterward flip the engine upside-down again and check that the torque on the bottom bolts hasn't changed. Check crankshaft and transmission shaft rotation one more time. Install the oil pump using new o-rings. This is a good time to reinstall the engine into the frame as it is at its lightest. The rest of the rebuild can be completed in the frame.
Get good machining. Find a machinist who frequently does Honda cylinders. Don't simply hone your cylinders. The piston-to-cylinder clearance on one of these vintage bikes fifty years down the road is sure to be between double and triple its factory-assembled value, thus the cylinders need to be machined for new pistons. The same with the cylinder head. Find a machinist who understands Hondas and who doesn't use antiquated American-made valve seat tools such as Souix, Black and Decker, Petersen or Neway. These tools will ruin your head. Also, do not default to simply lapping the valves. That is bad practice; it is not legitimate cylinder head rebuild technique.
Once the engine is back in the frame, prepare the cylinder base gasket surfaces on both crankcase and cylinder assembly. Resist the hype and advice that says to mill the engine parts or to install heavy-duty cylinder studs. Neither is needed and both are actually harmful. Adhesive is unecessary as well and actually a detriment on any Honda gasket save one, the head gasket. All of the little fours have locating dowels and special oil pressure orifices that must be clean and in their correct places, with new o-rings. Piston ring compressors (the factory ones are still available) are recommended but not absolutely necessary. Once the cylinder assembly is on, the 500/550/650 cam chain guide is installed. The CB350F guide installs after the head is installed. Note that the CB500/550 cam chain guide installs in a unique way unlike all the other fours. The guide's wear surface faces outward, not inward, and the cam chain loops around it, not next to it. After cleaning the cylinder head and cylinder top gasket surfaces, put one thin coat of Gaskacinch on each side of either an NOS Honda or a Cometic brand composite type head gasket. After it dries install the gasket. Then install the head. Torque the head nuts and bolts starting with the larger ones, and starting in the center and working your way outward, Do this in steps just as with the crankcase bolts. Don't forget the small 6mm bolts at the front and back of the head. Install your spark plugs to keep anything from falling into the cylinders. Install the six rubber wafers over their respective head nuts. Put a tiny bit of Hylomar or Gaskacinch over each wafer. Do not use silicone sealer. On the CB350F install the two cam oiling pipes.
Make sure that at least the ignition advancer (if not the whole ignition) is installed so engine timing can be done. Dab some Honda moly on the cam bearing saddles in the head and install the cam with its sprocket coming in from the left side. Time the cam to the crankshaft using the T mark on the advancer. After adjusting cam chain tension, double- and triple-check the timing after rotating the crankshaft two or three times. Pour some fresh engine oil over the camshaft, enough to partly fill the troughs under the cam. Spray 3M #77 adhesive onto a new factory Honda rubber cam cover (o-ring type) gasket, and dab a bit of the glue using a Q-Tip into the cover's groove to hold the gasket. Afterward, with a fingertip sparingly apply Hondabond #4 to the sealing surface on the head and on the cam cover. Yes, sealer in addition to the rubber seal--the small four cam cover is an exception to the no-sealer-on-rubber rule. Some folks promote using rubberbands to hold the rockers out of the way during cam cover installation. The better method is to back all of the valve adjusting screws out maximum. Then keep your eyes open as you place the cover onto the head. The rocker arms should never leave the tops of the valves as you settle the cover on. A little nudging of the crankshaft back and forth may be necessary to get the tach drive gear to engage with the cam and thus allow the cover to drift down. Don't hammer. Don't put any of the screws or bolts in the cam cover until it is within no more than an eighth-inch of the head. The right side of the cover may be slightly higher than the left because of the tach drive gear.
The folks on forums stress unnecessarily about the early CB500/550 cam covers. Yes, there is an official factory dealer bulletin advocating replacement of the later part in place of the earlier. But this is a non-issue. With more than a half-century of familiarity with this engine, I can assure you of this. Unless there is evidence of severe wear in your cam cover's shaft bores, you'll be fine. Moreover, both of the CB500 fours I have owned still had/have their early cam covers. My first bike had 92,000 miles on it when I sold it. It still had the early cover. No noise, no wear, no problems. My current CB500 is faultless and quiet as well. Do what you want. Fitting the later cover is not a bad idea. But neither is it essential. Your resources are better spent focusing on real issues such as ensuring good cylinder compression and optimizing your ignition and charging systems, not allowing inexperienced people on the Internet to dictate to you about things of which they know nothing.
The CB500/550 and CB350F cam covers have different bolt and screw and sealing washer setups. On all the small fours, the sealing washers go only onto those fasteners that are inboard of the cam cover's rubber (o-ring type) sealing gasket, which you can visualize easily though you can't actually see it. Resist the urge to replace any of these fasteners with Allen (cap) screws. They will ruin your head. Very gradually tighten down the cover. Start at the center and work your way outward in a criss-cross fashion, in three increasing tightening steps, just as with the crankcase and the cylinder head. Afterward adjust all the valves, in the engine's firing order of 1-2-4-3, using 0.005" for both intake and exhaust for the CB350F/400F, CB500/550 and CB650. Put new washers on the CB500/550's decorative cam end cover mounting brackets. The aluminum washer goes under the bracket, the steel washer on top of the bracket. Put new o-rings on the left and right decorative covers' locating dowels, lightly grease them.
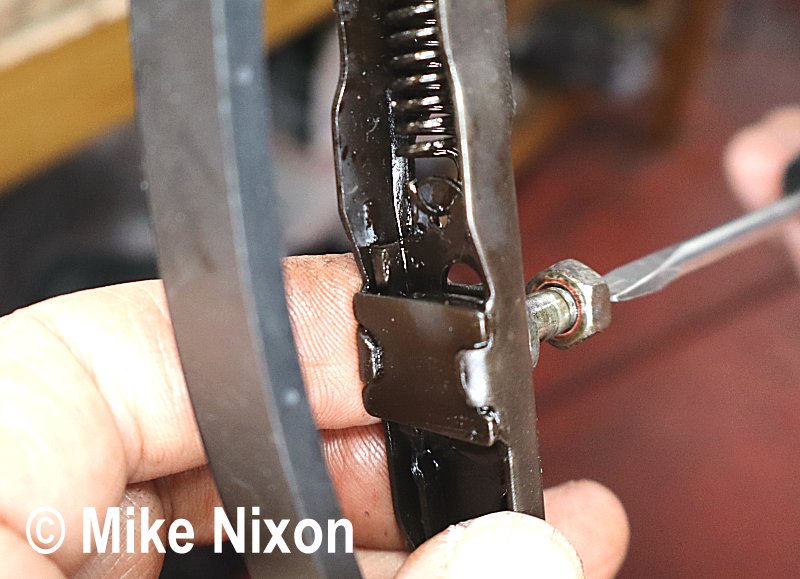
Though forums say otherwise, just looking at this CB500/550 cam chain tensioner would tell you it will benefit from persuation at its screwdriver slot, if the engine's needs didn't clue you in. The CB650's tensioner does not have a slot.
The cam chain tension should be checked again on the assembled engine. It is adjusted in very different ways on the CB350F and the CB500/550. The CB500/550 and 650 are all done with the engine running at an idle. The CB500/550 in particular usually benefits from a slight persuasion at the slotted adjuster, whereas with the 650 the lack of a slot means you must depend solely on the internal spring, and in some cases it works poorly. The CB350F on the other hand must never be done running as the tensioner can easily fail when doing so. Instead, the technique is completely static and very similar to the CB750. Rotate the crankshaft while watching the #4 intake open and close (the inspection cap is removed). After the valve had closed, keep rotating slowly until the 1/4 T mark is aligned. Loosen the tensioner locknut then the lockbolt, turn the crankshaft a very tiny amount more while at the same time snugging the lockbolt. Snug the locknut and replace the inspection cap. The CB650 tensioner is famous for being reluctant to work at times. Using the CB750 and CB350F's static adjustment method often will overcome this and make the cam chain quieter.
This is the professional way. Many voices propose methods other than these and in many cases contradictory to these. Like anything else, vetting quality is important. Establish trust, ability and credibility and you'll know who is telling you the right things.
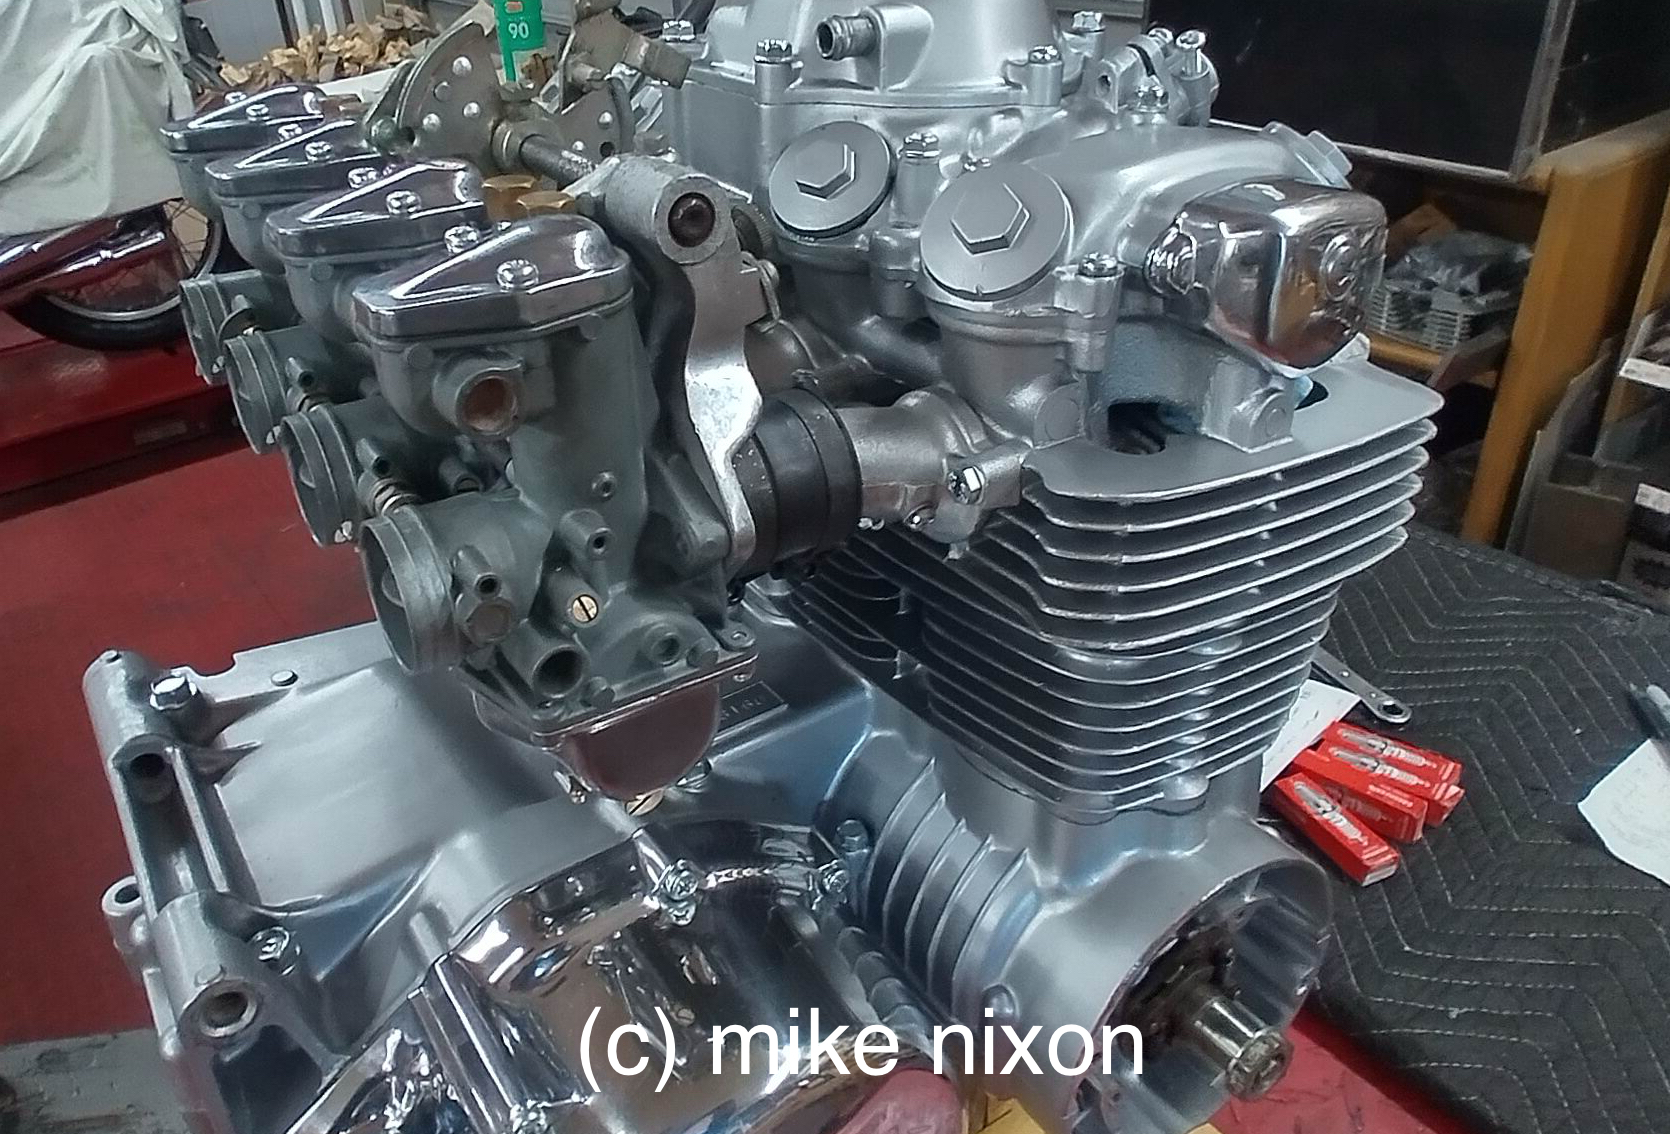
Some pictures highlighting the engine rebuild process can be found at this link.
|
 The smaller SOHC fours have a great following and they are wonderful machines. With the forums disseminating so much that is incorrect on the subject of rebuilding the smaller vintage Honda four engine, it begs an authoritative treatment. I hope to having a thoroughly illustrated CB500/550 engine rebuild how-to book available some time in 2025 or 2026.

|
|
|
Last updated June 2025 Email me www.motorcycleproject.com My bio © 1996-2025 Mike Nixon |